You just got a fresh crew cut. You walk out of the barbershop feeling like a million bucks. The next morning, you look in the mirror and… it’s just not the same.
Sound familiar?
Here’s the truth: a great haircut is fifty percent barber and fifty percent you. The barber creates the shape, but how you style it at home determines whether you look sharp or sleepy. And with a crew cut, styling is actually easier than you think.
Let’s walk through exactly how to style your crew cut at home with our step by step guide.
The Morning Routine: Step by Step
Styling a crew cut doesn’t require a twenty-minute ritual. Most days, you can be done in five minutes or less. Here’s the process.
Step 1: Start with Clean, Damp Hair
The best time to style a crew cut is right after your shower. Your hair is clean and slightly damp—the perfect foundation for styling.
Why damp hair works better: When your hair is damp, it’s more pliable. You can shape it the way you want, and the product will distribute more evenly. Trying to style bone-dry hair often leads to clumping and uneven texture.
Towel drying: Gently towel dry your hair until it’s damp but not dripping. Rough drying with a towel can cause frizz and breakage, so be gentle. Pat and squeeze rather than rub vigorously.
Pro tip: If you shower at night and your hair is dry in the morning, just use a spray bottle to lightly mist it. You don’t need a full wash—just enough moisture to work with.
Step 2: Apply Product the Right Way
Product choice matters, but technique matters just as much. Here’s how to apply product correctly.
How much to use: Start small. With crew cuts, a little goes a long way. A pea-sized amount is usually plenty for shorter styles. For longer tops, you might need a bit more—about the size of a small grape.
Warm it up: Rub the product between your palms until it warms up. This makes it easier to spread evenly. Cold product straight from the container tends to clump.
Apply evenly: Run your hands through your hair, starting at the back and working forward. Make sure the product reaches all areas, not just the front. Pay attention to the crown area, which people often miss.
Work it through: Use your fingers to work the product through to the ends. For textured styles, focus on the ends. For smoother styles, work it closer to the roots.
Pro tip: If you’re using a matte product, apply it to completely dry hair for the most natural look. If you’re using a shinier product, apply to damp hair for better distribution.
Step 3: Create Your Shape
Now comes the actual styling. Different crew cut styles require different techniques.
For classic crew cuts:
Use a comb to create clean lines. Comb the hair forward, then back, then into place. The classic crew cut should look neat and intentional. Use the comb to define the transition between top and sides.
For textured crew cuts:
Use your fingers to mess it up—intentionally. Grab small sections and twist or pinch them to create separation. The goal is controlled chaos. It should look effortless, not messy.
For side-swept styles:
Use a comb to direct the hair to one side. If you want a defined side part, use the tail of the comb to create a clean line. Then use your fingers to sweep the hair across.
For spiky styles:
Use your fingertips to lift sections upward. Don’t make every spike the same size—vary them slightly for a natural look. Focus on the front and crown areas where spikes have the most impact.
Pro tip: Style in the direction your hair naturally grows. Fighting your natural growth pattern leads to a look that never quite settles and requires constant adjustment throughout the day.
Step 4: The Final Adjustments
Step back and look at your work. Here’s what to check:
Front view: Does it look balanced? Is one side higher than the other?
Side view: Does the transition from top to sides look smooth?
Back view: Use a second mirror or take a phone photo. The back is easy to neglect.
Make small adjustments where needed. If something looks off, dampen that section slightly and restyle it rather than adding more product.
Product Guide: What to Use for Your Crew Cut
The product you choose makes a huge difference. Here’s what works for different crew cut styles.
Matte Clay
Best for: Textured crew cuts, natural looks, men with thicker hair
What it does: Provides medium to strong hold with zero shine. It gives you that “I woke up like this” look while actually keeping your hair in place.
How to use: Warm between palms, work through dry or slightly damp hair, style with fingers.
Our recommendation: Clay is probably the most versatile product for crew cuts. It works for most styles and hair types.
Pomade
Best for: Classic crew cuts, side-swept styles, professional looks
What it does: Provides hold with shine. Water-based pomades wash out easily; oil-based last longer but require more effort to remove.
How to use: Apply to damp hair, comb into place, let it dry naturally or use a blow dryer for extra volume.
Our recommendation: If you want that polished, boardroom-ready look, pomade is your friend.
Gel
Best for: Spiky crew cuts, maximum hold, humid climates
What it does: Provides the strongest hold with high shine. It locks hair in place and doesn’t move until you wash it out.
How to use: Apply to damp hair, style immediately, let it dry without touching it.
Our recommendation: Use gel when you need your style to survive wind, humidity, or a long day. But use it sparingly—too much gel looks crunchy.
Paste
Best for: Medium hold, natural finish, men with finer hair
What it does: Similar to clay but lighter. It provides hold without weighing hair down.
How to use: Work through damp or dry hair, style with fingers for a natural look.
Our recommendation: Paste is a good middle ground if clay feels too heavy but gel feels too stiff.
Sea Salt Spray
Best for: Wavy crew cuts, beachy texture, adding volume
What it does: Adds texture and volume without heavy product. It enhances natural waves rather than fighting them.
How to use: Spray into damp hair, scrunch with hands, let air dry or use a diffuser.
Our recommendation: This is a great option for men with naturally wavy or curly hair who want to enhance their texture.
Hair Cream
Best for: Light hold, dry scalps, mature men
What it does: Provides very light hold with moisture. It’s more about conditioning than styling.
How to use: Apply to damp hair, comb into place, let dry naturally.
Our recommendation: Hair cream is good for older men or those with dry scalps who want just a touch of control without looking “done.”
Quick Product Reference
| Style | Best Product | Hold Level | Shine |
|---|---|---|---|
| Classic Crew | Pomade | Medium | High |
| Textured Crew | Matte Clay | Strong | None |
| Spiky Crew | Gel | Very Strong | High |
| Side Swept | Pomade or Paste | Medium | Varies |
| Wavy Crew | Sea Salt Spray | Light | None |
| Natural Look | Paste or Cream | Light | None |
Tools of the Trade
You don’t need much to style a crew cut at home. Here’s what matters:
A good comb: Get a quality comb with both fine and wide teeth. The fine teeth are for detail work; the wide teeth are for distributing product.
A small mirror: A handheld mirror helps you check the back and sides. Or use your phone camera—it’s 2025, after all.
A spray bottle: Fill it with water for quick restyling without a full shower.
A blow dryer (optional): If you want extra volume, a blow dryer on low heat can lift your hair before you apply product. Use your fingers to lift at the roots while drying.
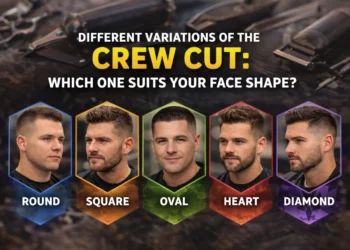
Also read: How to Choose the Perfect Crew Cut for Your Face Shape
Common Styling Mistakes and How to Fix Them
Even experienced guys make mistakes. Here’s what to watch out for.
Mistake 1: Using Too Much Product
The problem: Your hair looks greasy, heavy, or crunchy. It might even look wet hours after application.
The fix: Use less next time. Start with half what you think you need. You can always add more, but you can’t take it out without rewashing.
If you’ve already applied too much: Try running a comb through your hair to distribute the excess. If that doesn’t work, dampen your hands and run them through your hair to dilute the product.
Mistake 2: Wrong Product for Your Hair Type
The problem: Your style falls flat within an hour, or it looks completely different from what you wanted.
The fix: Match your product to your hair. Fine hair needs lighter products like paste or cream. Thick hair needs stronger products like clay or gel. Oily hair might do better with matte products that don’t add shine.
Mistake 3: Styling in the Wrong Direction
The problem: Your hair won’t stay where you put it, or it looks unnatural.
The fix: Work with your natural growth patterns, not against them. Notice which way your hair falls when it’s wet and unstyled—that’s its natural direction. Style with that flow, and everything stays in place better.
Mistake 4: Forgetting to Check the Back
The problem: The front looks great, but the back is a mess. You don’t notice until someone sees you from behind.
The fix: Always check the back. Use a second mirror or take a quick phone photo. The extra ten seconds saves you from embarrassment later.
Mistake 5: Styling Completely Dry Hair
The problem: Product clumps, distribution is uneven, and your style looks patchy.
The fix: Always style with slightly damp hair. If your hair is dry, mist it with water first. Product spreads much more evenly on damp hair.
Morning vs. Evening: Should You Restyle?
Here’s a question guys often ask: Should I restyle my hair in the afternoon?
It depends.
If your style has fallen completely flat, you can refresh it with a tiny amount of water and product. Dampen your hands and run them through your hair, then add a pea-sized amount of product if needed.
But if your hair still looks decent, leave it alone. Too much manipulation leads to buildup and a heavy look.
For most crew cuts, one morning styling session is enough to last all day.
Seasonal Styling Tips
Your styling routine might need to change with the seasons.
Summer: Heat and humidity can flatten your style or make it frizzy. Use stronger hold products and consider a slightly shorter cut. Gel works well in humid weather because it locks everything in place.
Winter: Cold, dry air can lead to static and dryness. Use products with moisturizing ingredients. A little hair cream under your styling product can help combat dryness.
Rainy days: If you know you’ll be in wet weather, use a water-resistant product like gel or heavy pomade. And accept that you might need to restyle when you get inside.
Final Thoughts
Styling a crew cut at home doesn’t have to be complicated. With the right technique and the right product, you can look sharp every day with just a few minutes of effort.
The key is consistency. Use the same routine for a few days and see how it works. Make small adjustments based on your hair type and the look you want. Within a week or two, you’ll have a routine that takes almost no thought—you’ll just do it automatically.
And remember: even on days when your style doesn’t cooperate, a crew cut always looks decent. It’s one of the most forgiving haircuts out there. A little imperfection just adds character.
So grab your product, find your routine, and own that look. Your barber did their part—now it’s your turn.